This guide explains how to configure ProximityLock's settings to work best with your device and environment.
Do I Need to Read This? Only if you want to fine-tune! We set the defaults to work for most people. Just select your device and enable monitoring. You can come back here later if you need to adjust anything.
When you first launch ProximityLock, macOS will request several permissions. All of these are required for ProximityLock to function properly.
ProximityLock needs Bluetooth access to scan for and monitor your devices.
When prompted: Click OK to allow Bluetooth access. Without this permission, ProximityLock cannot detect any devices.
ProximityLock will request permission to send you notifications.
When prompted: Click Allow to enable notifications. You'll want these alerts, especially if something goes wrong with the locking process.
If you need to review or change permissions after initial setup:
Once permissions are granted, you're ready to configure ProximityLock. The screenshots below show you exactly what to expect.
Note: We set the defaults to be intentionally relaxed. Better to be patient than to lock your computer while you're still sitting there. Once you see how ProximityLock behaves in your environment, you can adjust the threshold and timeout to match your workspace and security needs.
In the main window, click the Settings... button located to the right of your selected device name.
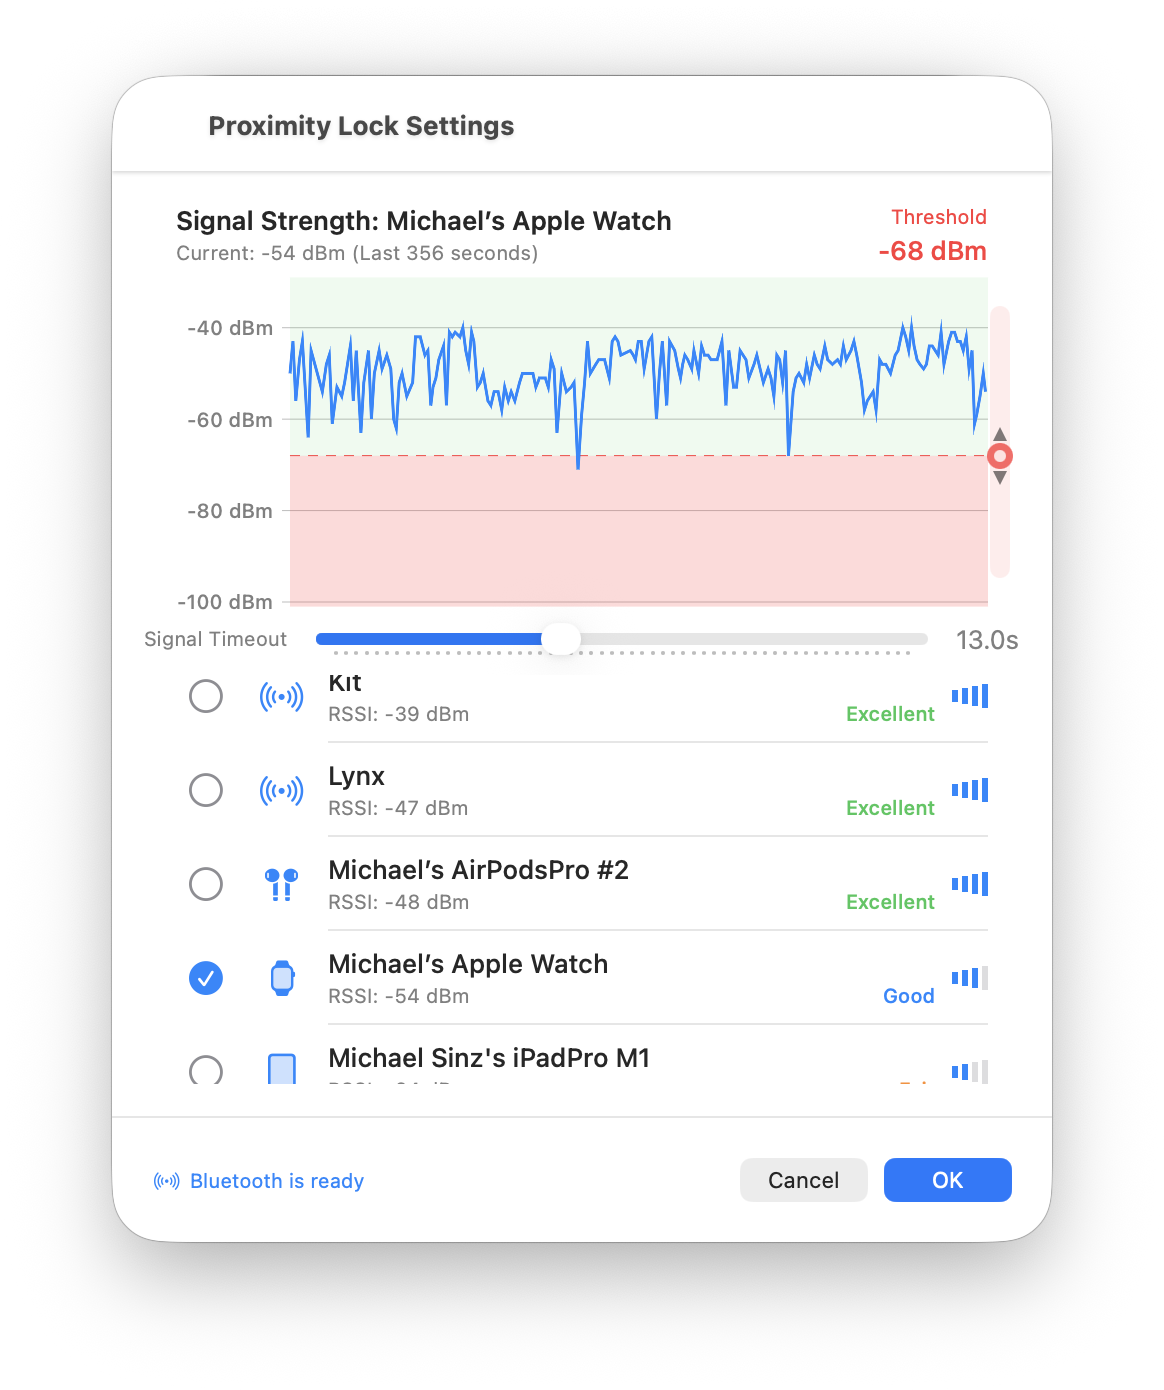
The settings window opens with a real-time signal strength graph at the top. This graph is your key to understanding ProximityLock's behavior:
In the device list at the bottom of the settings window:
Can't find your device? Make sure Bluetooth is enabled on both your computer and the device. Some devices only advertise when they're not connected to other Bluetooth accessories. Try disconnecting other devices temporarily.
The threshold determines how weak the signal must be before ProximityLock considers your device "out of range":
Understanding threshold values:
Need a quick refresher? See the Threshold FAQ entry.
Best Practice: Watch your device's signal on the graph to see where it typically sits when you're at your desk. Set your threshold a few dBm below this typical signal strength to account for normal fluctuations.
Below the graph, find the "Signal Timeout" slider. This setting determines how long ProximityLock waits before deciding you've actually left:
Bluetooth devices don't broadcast constantly. They advertise themselves periodically (like shouting "I'm here!" every few seconds). Sometimes these signals get missed due to:
The timeout setting prevents ProximityLock from mistaking these temporary signal hiccups for you actually leaving.
Need a quick refresher? See the Timeout FAQ entry.
Environment Matters: Clean environment with few devices? Shorter timeout works well. Busy office with lots of Bluetooth devices and Wi-Fi? Go longer (15-20 seconds).
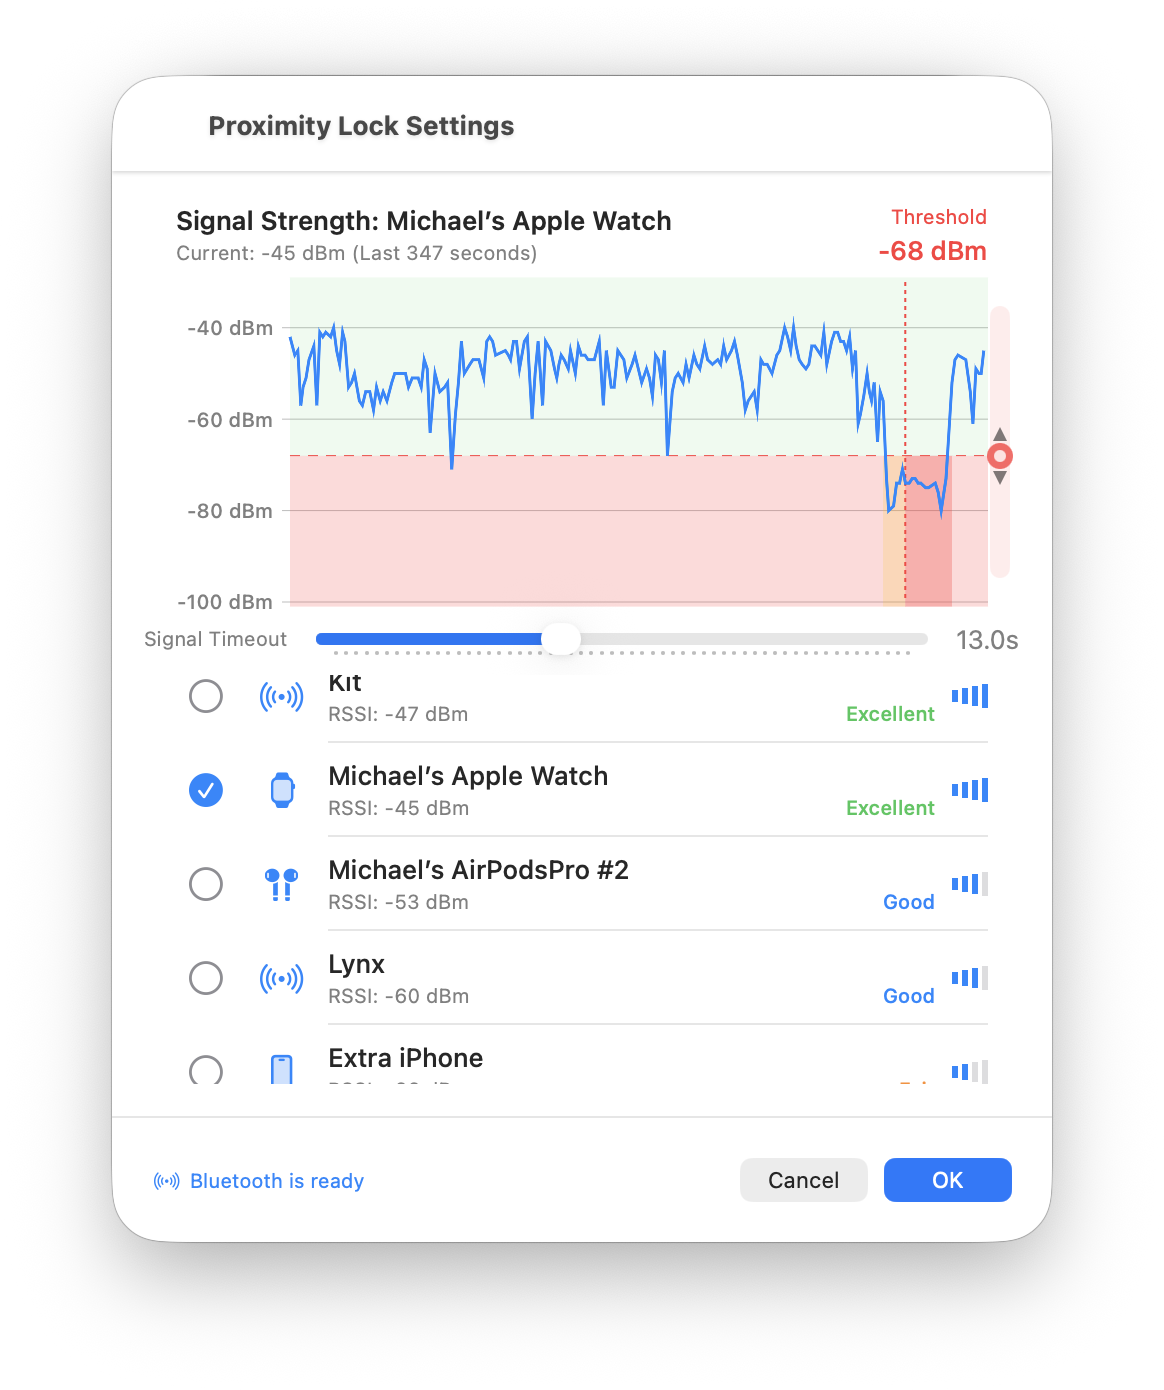
The signal graph shows historical "lock events". Times when ProximityLock would have locked (or did lock) your screen based on your current settings:
What this tells you:
Click the blue OK button at the bottom right of the settings window to save your configuration.
Back in the main window:
Look at the top of the main window. You should see:
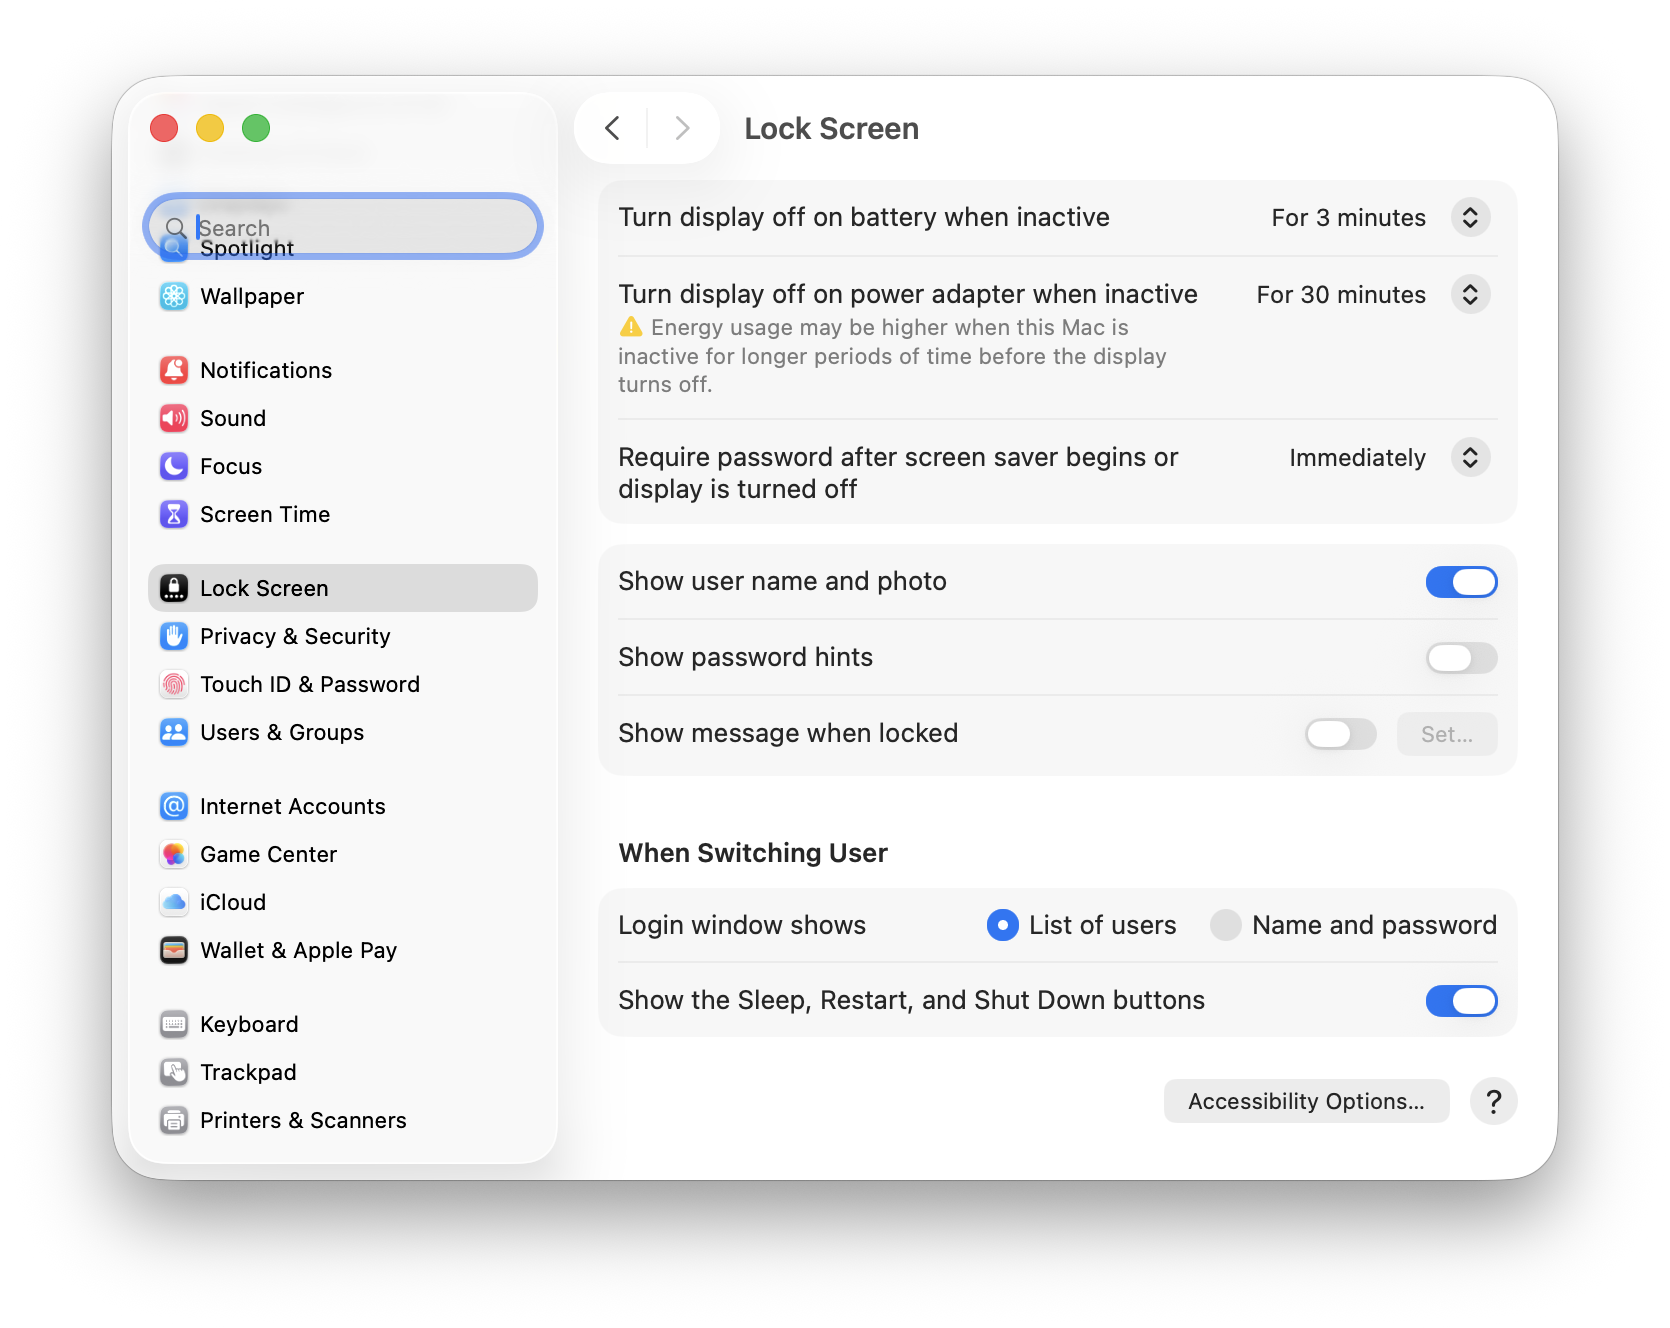
Critical: ProximityLock can start your screen saver, but macOS controls whether that screen saver actually locks your computer. For real security, you must enable:
System Settings → Lock Screen → "Require password immediately after sleep or screen saver begins"
Without this setting, ProximityLock will activate your screen saver, but anyone can wake it up without a password. Don't skip this step!
ProximityLock uses the screen saver mechanism because macOS doesn't provide an officially approved API for directly locking the computer. We chose this approach to use only Apple-approved, documented APIs, ensuring reliability and App Sandbox compliance. The screenshot above shows where to find this critical setting in System Settings.
Before trusting ProximityLock with your security, test it:
We set reasonable defaults, but every environment is different. Your desk setup, the number of nearby Bluetooth devices, building materials, and even how you carry your device all affect performance.
Our Recommendation: Live with the defaults for a few days, then fine-tune based on your experience:
© 2025-2026 - Michael Sinz